

FREE Complications Webinar
Want to overcome your fear of complications and confidently master anatomy?
Join us for one of Dr Tim's FREE upcoming webinars. .
Check dates here and save your spot
 Dr Tim Pearce
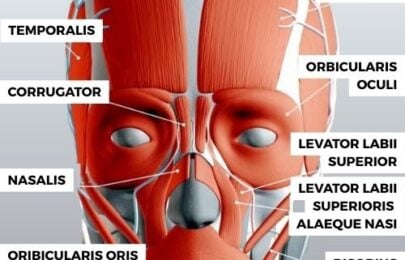
Most aesthetic practitioners find cheeks difficult to inject. The midface has multiple angles of projection, and knowing whether to place filler laterally or medially depends entirely on understanding one thing: which direction the bone surface faces.
When you project outwards from any surface, you get a different result. Take a male cheek, often strong but relatively smaller compared to the rest of the face. The superior aspect of the zygoma tilts slightly upward. There’s an anterior-facing element too. Inject at the anterior surface and you project the cheek forward. Move one centimeter lateral and now you’re projecting outward in a completely different direction.
Position your injection slightly higher on the zygomatic bone? You get an upward projection. This matters particularly for female patients. Getting onto the upper surface creates more upward lift and produces more aesthetically pleasing results.
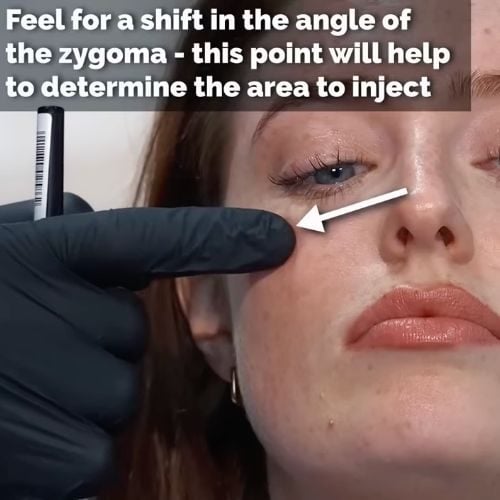
Feel along the bone to understand which direction the zygomatic surface faces. You’ll develop an intuitive sense of bone direction over time, but check before you inject.
Feeling the direction of the zygoma takes seconds and reveals exactly what you need to know. You can identify where there’s a definite shift in angle. This transition point is easy to locate.
From an aesthetic perspective, you need to know where the angle of the cheek sits and which direction you want to change it. Outwards? Anteriorly? Somewhere between?
That decision guides everything.
Start by using your fingers to identify where the anterior and lateral surfaces sit. Then feel for the corner between these two surfaces, it runs parallel with the lateral canthus. This corner gives you the “beauty point” that creates cheek definition.
You can draw a line from the root of the helix to the alar base. This helps, but there’s a catch: because you’re working with a curved surface, you can draw a straight line multiple ways and miss your target point.
The beauty point sits at the junction of three surfaces. You can feel an upward tilt, a frontal tilt, inferior lateral, and superior lateral surfaces all meeting. You want to land on that point. Validate your palpation findings with the helix-to-alar-base line marking.
If you struggle with this at first, use a string or any straight object laid across the face. This gives you a reliable starting reference.
When you go in at the identified point, stay more on the lateral side. Feel for the sense that the bone faces you in a specific direction.
That’s where you place your first injection.
You’ll need another injection point about one centimeter away. Where facial ligaments attach, you get weak spots on the skin. These make excellent injection locations.
Moving posteriorly along the zygomatic arch, there’s less certainty about how the product behaves. Some studies show filler spreads above and below in posterior regions. Up to the points described above, you maintain predictable control.
Your goal: create a rounded, teardrop-like shape. Think of it like a spoon where the deepest part represents the area of greatest definition, with contour fading away naturally from that central point.
If you only do those injections without considering overall shape, you risk creating an “empty spoon” effect. Too much definition and insufficient supporting volume. You’ll often need a small amount of additional volume in surrounding areas. This decision usually becomes clear during treatment, though experienced practitioners can sometimes predict the need beforehand.
The junction between the cheek and eyelid sometimes needs improvement. You can inject directly on the periosteum here. Locate the eyeball, then the orbital rim, staying right on the bone. This is upper cheek work, not an eye injection, but it works well for restoration.
The lateral lid-cheek junction becomes more prominent with age. You don’t see this as often in younger people as you do tear trough, which appears even in kids. This junction makes people look tired or sad. It develops later in the aging process.
Treatment volume is usually small.
For more anterior projection, feel for that anterior surface again and place a small injection there. The entry angle changes significantly for anterior work. You wouldn’t enter perpendicular to a lateral surface, you’d approach the anterior surface at its appropriate angle.
Direction of approach matters for achieving the intended result.
The area on bone is relatively safe compared to other facial regions. When you’re on bone, there aren’t many vessels to worry about. But several blood vessels need consideration.

When the patient smiles, observe where the greatest bulk of the cheek appears. Results should look balanced, with treated areas showing fullness without creating an overly heavy appearance on the lower face.
Proper upper cheek treatment should be primarily restorative and slightly beautifying. The lateral lid-cheek junction treatment often shows immediate improvement on the treated side, with visible difference in fullness and contour compared to the untreated side.
Should you inject different amounts on different sides if one side has more natural volume?
Usually no.
Consider the analogy of a single vodka and coke versus a double vodka and coke. Visually, they look virtually the same because the relative difference is small. But if you add a shot to each drink, you now have a double versus a triple. The difference between them becomes much more apparent.
The same applies to facial asymmetry. You can decrease asymmetry by doing the same treatment on both sides. This proves much easier than trying to calculate different amounts, like 0.6ml on one side versus another amount on the opposite side.
Palpate the bone to understand surface direction before injecting. Identify the junction of three surfaces to locate the beauty point. Use the helix-to-alar-base line as a validation tool. Consider the overall teardrop or spoon shape you’re creating. Include the lateral lid-cheek junction for facial restoration. Understand the vascular anatomy, particularly where the transverse facial artery runs. Treat both sides equally to reduce asymmetry.
Every surface of the zygoma faces a different direction.
That direction determines your projection result.
Join us for one of Dr Tim's FREE upcoming webinars. .
Check dates here and save your spot

Dr Tim Pearce MBChB BSc (Hons) MRCGP founded his eLearning concept in 2016 in order to provide readily accessible BOTOX® and dermal filler online courses for fellow Medical Aesthetics practitioners. His objective was to raise standards within the industry – a principle which remains just as relevant today.
Our exclusive video-led courses are designed to build confidence, knowledge and technique at every stage, working from foundation level to advanced treatments and management of complications.
Thousands of delegates have benefited from the courses and we’re highly rated on Trustpilot. For more information or to discuss which course is right for you, please get in touch with our friendly team.